
Linux(およびUNIX系のOS)には、SSH接続でログインした際にあらかじめ設定したメッセージを表示させる機能がある。
基本的には「/etc/motd」にそのメッセージを記述しておくのだが、個人的な趣味嗜好(派手なの大好き!)より、このメッセージにコマンドの実行結果を表示させたくなった。
俺はSSHでサーバにログインした時、色付きのアスキーアートとか表示させたいんだ!派手な感じの見た目がいいんだ!なんかメモリとかの値を色々表示させたいんだー!!
というわけで、その方法を調べてみることにした。
なお、ここで扱うLinuxには、「screenFetch」および「ARCHEY」をインストールしているので、基本的にそれを用いて動的に変化させていく。
1.「.bashrc」に記述する方法
最もお手軽な方法としては、「.bashrc」に実行させるコマンドを記述させることで、ターミナルに入るごとにそのコマンド実行結果が表示させる方法だ。
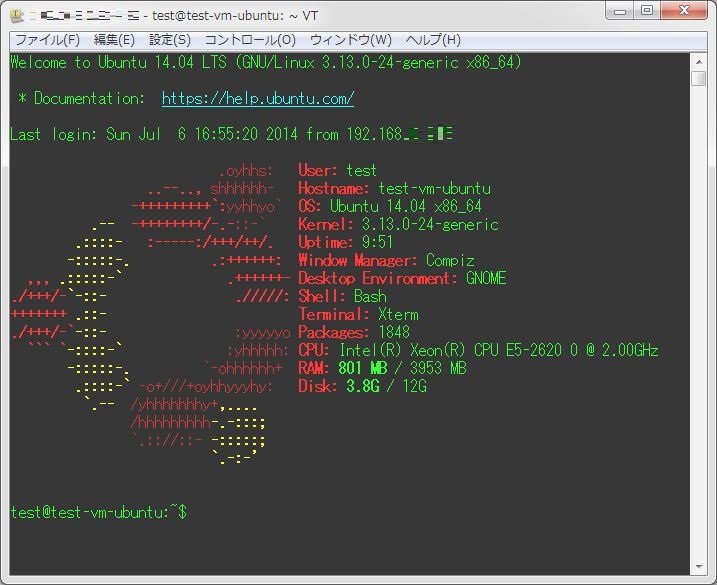
上の画像は、単純に「.bashrc」で「archey」を実行させるように設定させたもの。
以下に、サンプルとしてtestユーザの「.bashrc」を記載する。
test@test-vm-ubuntu:~$ cat .bashrc
# ~/.bashrc: executed by bash(1) for non-login shells.
# see /usr/share/doc/bash/examples/startup-files (in the package bash-doc)
# for examples

# If not running interactively, don't do anything
case $- in
    *i*) ;;
      *) return;;
esac

# don't put duplicate lines or lines starting with space in the history.
# See bash(1) for more options
HISTCONTROL=ignoreboth

# append to the history file, don't overwrite it
shopt -s histappend

# for setting history length see HISTSIZE and HISTFILESIZE in bash(1)
HISTSIZE=1000
HISTFILESIZE=2000

# check the window size after each command and, if necessary,
# update the values of LINES and COLUMNS.
shopt -s checkwinsize

# If set, the pattern "**" used in a pathname expansion context will
# match all files and zero or more directories and subdirectories.
#shopt -s globstar

# make less more friendly for non-text input files, see lesspipe(1)
[ -x /usr/bin/lesspipe ] && eval "$(SHELL=/bin/sh lesspipe)"

# set variable identifying the chroot you work in (used in the prompt below)
if [ -z "${debian_chroot:-}" ] && [ -r /etc/debian_chroot ]; then
    debian_chroot=$(cat /etc/debian_chroot)
fi

# set a fancy prompt (non-color, unless we know we "want" color)
case "$TERM" in
    xterm-color) color_prompt=yes;;
esac

# uncomment for a colored prompt, if the terminal has the capability; turned
# off by default to not distract the user: the focus in a terminal window
# should be on the output of commands, not on the prompt
#force_color_prompt=yes

if [ -n "$force_color_prompt" ]; then
    if [ -x /usr/bin/tput ] && tput setaf 1 >&/dev/null; then
        # We have color support; assume it's compliant with Ecma-48
        # (ISO/IEC-6429). (Lack of such support is extremely rare, and such
        # a case would tend to support setf rather than setaf.)
        color_prompt=yes
    else
        color_prompt=
    fi
fi

if [ "$color_prompt" = yes ]; then
    PS1='${debian_chroot:+($debian_chroot)}\[\033[01;32m\]\u@\h\[\033[00m\]:\[\033[01;34m\]\w\[\033[00m\]\$ '
else
    PS1='${debian_chroot:+($debian_chroot)}\u@\h:\w\$ '
fi
unset color_prompt force_color_prompt

# If this is an xterm set the title to user@host:dir
case "$TERM" in
xterm*|rxvt*)
    PS1="\[\e]0;${debian_chroot:+($debian_chroot)}\u@\h: \w\a\]$PS1"
    ;;
*)
    ;;
esac

# enable color support of ls and also add handy aliases
if [ -x /usr/bin/dircolors ]; then
    test -r ~/.dircolors && eval "$(dircolors -b ~/.dircolors)" || eval "$(dircolors -b)"
    alias ls='ls --color=auto'
    #alias dir='dir --color=auto'
    #alias vdir='vdir --color=auto'

    alias grep='grep --color=auto'
    alias fgrep='fgrep --color=auto'
    alias egrep='egrep --color=auto'
fi

# some more ls aliases
alias ll='ls -alF'
alias la='ls -A'
alias l='ls -CF'

# Add an "alert" alias for long running commands.  Use like so:
#   sleep 10; alert
alias alert='notify-send --urgency=low -i "$([ $? = 0 ] && echo terminal || echo error)" "$(history|tail -n1|sed -e '\''s/^\s*[0-9]\+\s*//;s/[;&|]\s*alert$//'\'')"'

# Alias definitions.
# You may want to put all your additions into a separate file like
# ~/.bash_aliases, instead of adding them here directly.
# See /usr/share/doc/bash-doc/examples in the bash-doc package.

if [ -f ~/.bash_aliases ]; then
    . ~/.bash_aliases
fi

# enable programmable completion features (you don't need to enable
# this, if it's already enabled in /etc/bash.bashrc and /etc/profile
# sources /etc/bash.bashrc).
if ! shopt -oq posix; then
  if [ -f /usr/share/bash-completion/bash_completion ]; then
    . /usr/share/bash-completion/bash_completion
  elif [ -f /etc/bash_completion ]; then
    . /etc/bash_completion
  fi
fi

# add
archey
変更したのは、最終行に「archey」を追加しただけ。結構お手軽に動的なログインメッセージが作成できた。
しかし、今の表示だとmotdの表示も同時に存在しているため、ちょっとくどい…
そこで、「/etc/pam.d/sshd」に記述されている以下の2行をコメントアウトし、motdを無効化する。
session    optional     pam_motd.so  motd=/run/motd.dynamic noupdate
session    optional     pam_motd.so # [1]
その状態でログインした結果が以下。

デフォルトで設定されていたmotdの表示を削除することに成功した。
さて、これで実用に全く問題が無いかと思われるだろうが、この手法には以下の3つの問題点がある。
- 「.bashrc」はユーザごとに存在する
- 普通にローカルの端末を開いただけでも表示される
- ユーザのスイッチでも表示される
それぞれの問題点について説明していこう。
1.「.bashrc」はユーザごとに存在する
そう、この「.bashrc」は各ユーザのホームフォルダに存在するファイルのため、もし全ユーザで設定するのであれば、各ユーザごとに設定を行う必要がある。
…といっても、これは簡単に解決出来る。ユーザの作成前に、ユーザ追加時のデフォルト設定を変更すればいいのだ。
ユーザのデフォルト設定は「/etc/skel/」に存在するので、ここのファイルを書きかえればいい。
2.普通にローカルの端末を開いただけでも表示される
以降の2つがちょっとよろしくない内容。
そう、この設定だとローカルホストで端末を開いた場合にも同じ表示がされるのだ!
実際の画面がこちら。
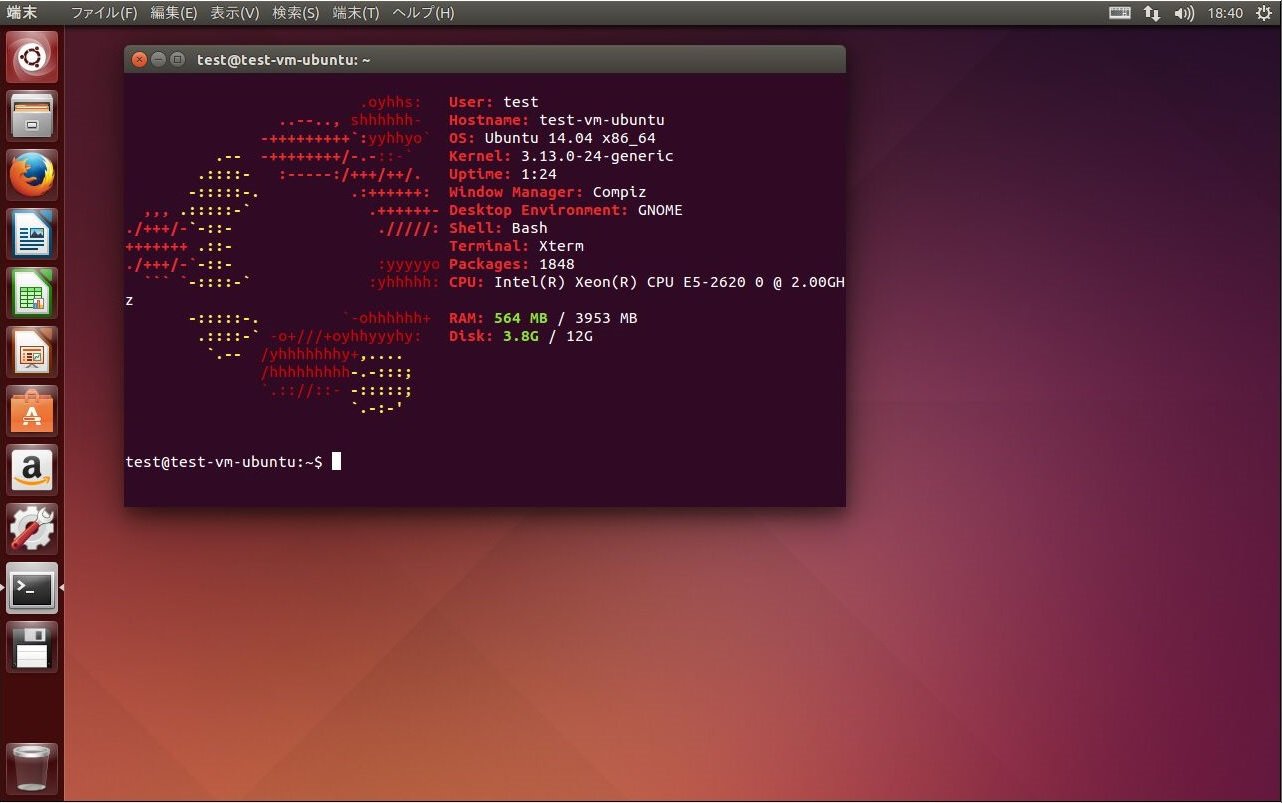
うーん、これはちょっと…
3.ユーザのスイッチでも表示される
1点目の問題として、各ユーザごとに「.bashrc」で設定されている必要があると記述したが、それによってsuコマンドでユーザをスイッチしても表示されてしまう。
例えば、「sudo su」でrootに切り替えたとして、rootの「.bashrc」で同じ設定がされていた場合、以下のように表示される。
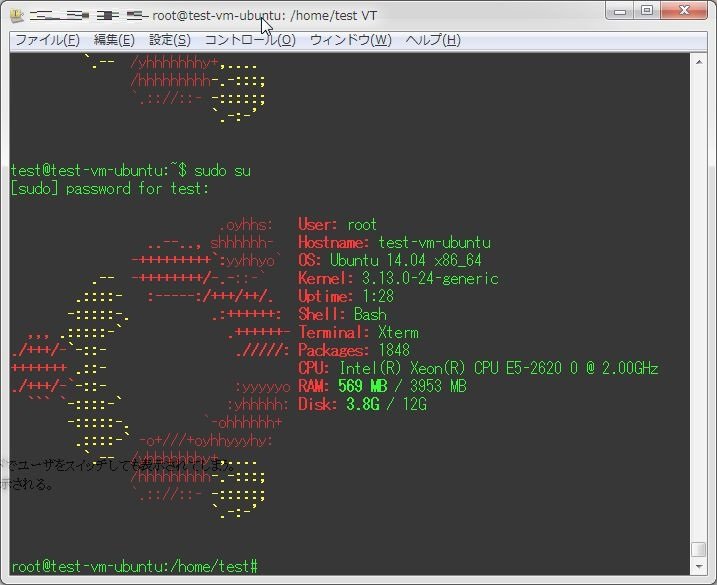
うーん、これはウザイ…
個人的にこの方法は不採用かなぁ…
やはり、「motd」を用いた方法で考えるべきかな。
2.Debian/Ubuntuの場合
さて、それではどうするか。
実はDebian/Ubuntuの場合、結構簡単に設定出来るのだ。
実はDebianやUbuntuの場合、motdはすでに動的に作成されている。(以後、検証にはUbuntuを用いているのでその内容を記述している)
Ubuntuの場合、デフォルトで「/etc/update-motd.d」というディレクトリが存在しており、その配下にスクリプトが存在している。
root@test-vm-ubuntu:~# ls -la /etc/update-motd.d/
合計 40
drwxr-xr-x 2 root root 4096 4月 22 09:31 .
drwxr-xr-x 133 root root 12288 7月 6 18:39 ..
-rwxr-xr-x 1 root root 1220 2月 20 11:43 00-header
-rwxr-xr-x 1 root root 1358 2月 20 11:43 10-help-text
-rwxr-xr-x 1 root root 149 8月 22 2011 90-updates-available
-rwxr-xr-x 1 root root 299 4月 12 07:06 91-release-upgrade
-rwxr-xr-x 1 root root 142 8月 22 2011 98-fsck-at-reboot
-rwxr-xr-x 1 root root 144 8月 22 2011 98-reboot-required
これらのスクリプトが順番に実行され、「motd」で表示されるファイルとなる「/var/run/motd.dynamic」というファイルが作成されるようだ。
ということは、このディレクトリにmotdで表示させたいコマンドを記述したスクリプトを設置することで、動的なメッセージを作成可能ということになる。
早速やってみることにした。
作成を単純にするため、設置するスクリプトは作成する一つのみにして、もともとあったスクリプトは全部削除した。
作成したスクリプトは以下。なお、archeyは動かなかったので、ここではscreenfetchを実行させている。
00-motd
#!/bin/sh
# Header
[ -r /etc/lsb-release ] && . /etc/lsb-release

if [ -z "$DISTRIB_DESCRIPTION" ] && [ -x /usr/bin/lsb_release ]; then
        # Fall back to using the very slow lsb_release utility
        DISTRIB_DESCRIPTION=$(lsb_release -s -d)
fi

printf "=========================================================\n"
printf "Welcome to %s (%s %s %s)\n" "$DISTRIB_DESCRIPTION" "$(uname -o)" "$(uname -r)" "$(uname -m)"
printf "\n"

# run screenFetch
screenfetch

# Footer
printf "=========================================================\n"
スクリプト設置後、権限を755にしないとうまく動いてくれない。
chmod 755 /etc/update-motd.d/*実行した結果がこちら。
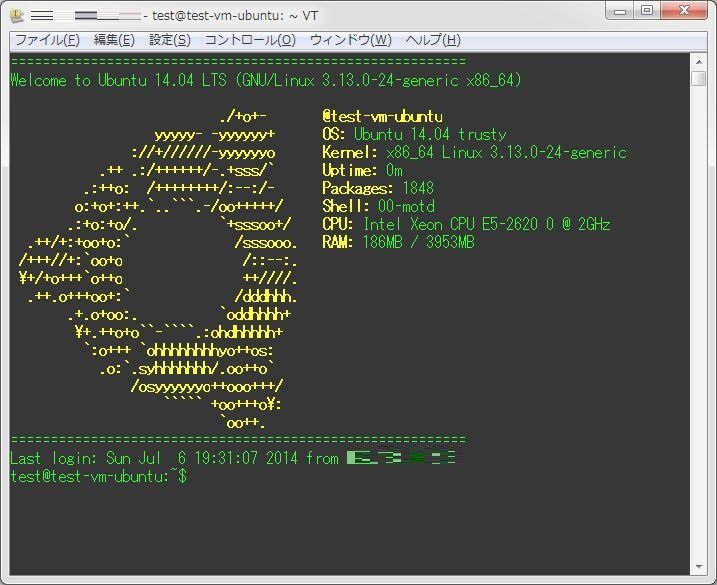
ログイン時のみの表示になっているし、無事動的なメッセージを表示させることに成功したようだ。
普通にSSH接続する際のメッセージよりかっこいいし、サーバの情報も動的に取得出来ている。
「ARCHEY」を用いる事が出来なかったのは残念だが、これなら有りかなぁ。
3.RHEL系Linuxの場合
さて、次はRHEL系Linuxで動的なmotdのメッセージを表示させるにはどうすればいいのか。
そもそも、「/etc/motd」にある程度動的な値が入ってさえいればいいんだよなぁ…
というわけで、「/etc/motd」に値を記述するスクリプトを別途作成し、それをcronで5分ごとに実行させる事にした。
作成には、こちらのスクリプトを参考にさせてもらった。感謝!
まず、以下のようなスクリプトを作成する。
update_motd.sh
#!/bin/bash

FILE_MOTD='/etc/motd'

BIN_DATE='/bin/date'
BIN_FIGLET='/usr/bin/figlet'
BIN_HOSTNAME='/bin/hostname'
BIN_IP='/sbin/ip'
BIN_GREP='/bin/grep'
BIN_SED='/bin/sed'
BIN_UPTIME='/usr/bin/uptime'
BIN_CAT='/bin/cat'
BIN_UNAME='/bin/uname'
BIN_FREE='/usr/bin/free'
BIN_HEAD='/usr/bin/head'
BIN_TAIL='/usr/bin/tail'
BIN_DF='/bin/df'
BIN_AWK='/bin/awk'
BIN_BC='/usr/bin/bc'
BIN_PS='/bin/ps'
BIN_SCREENFETCH='/usr/bin/screenfetch'

COLOR_LIGHT_GREEN='\033[1;32m'
COLOR_LIGHT_BLUE='\033[1;34m'
COLOR_YELLOW='\033[1;33m'
COLOR_RED='\033[0;31m'
COLOR_WHITE='\033[1;37m'
COLOR_DEFAULT='\033[0m'

echo -e "
${COLOR_DEFAULT}=========================================================
${COLOR_DEFAULT}Welcome to ${COLOR_LIGHT_BLUE}$(${BIN_CAT} /etc/redhat-release) ${COLOR_DEFAULT}.
" > ${FILE_MOTD}

${BIN_SCREENFETCH} >> ${FILE_MOTD}

echo -e "
${COLOR_DEFAULT}=========================================================
" >> ${FILE_MOTD}
このスクリプトを「/usr/local/bin/」に設置し、権限を755にして実行権限を付与する。
[root@test-centos ~]# cp update_motd.sh /usr/local/bin/
[root@test-centos ~]# chmod 755 /usr/local/bin/update_motd.sh
[root@test-centos ~]# chmod +x /usr/local/bin/update_motd.sh
最後に、crontabで5分間隔で実行させるよう設定する。
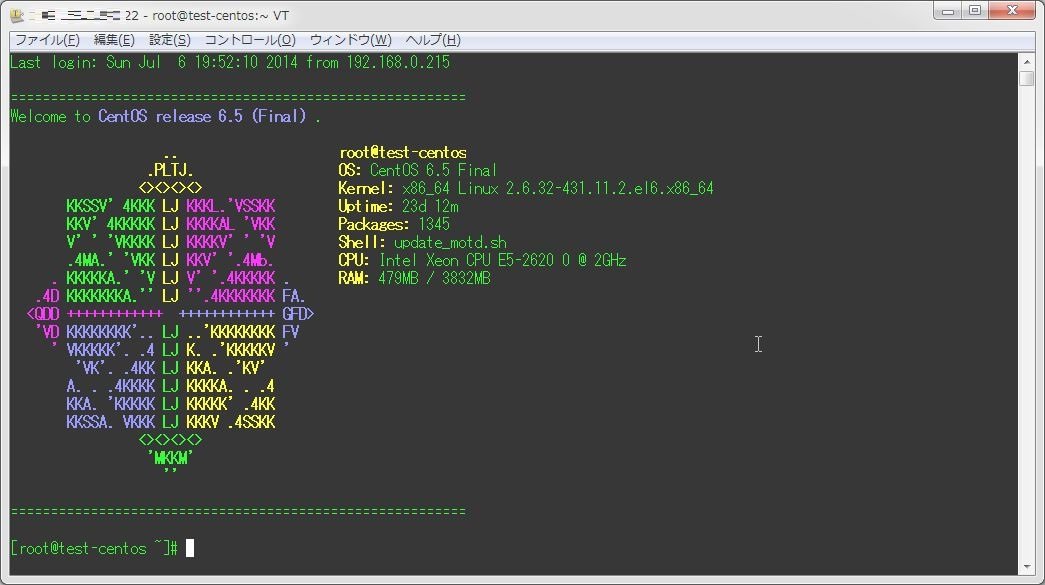
これで、CentOS等でも動的にmotdを作成出来るようになった。

