を導入する")
今回は、CentOS7でNginx・MariaDB・PHP7を利用した環境(LEMP環境)の構築を行う。
なお、作業の前提としてSELinuxはすでに停止済みとする。
1.前提パッケージの導入
まず、前提パッケージであるNginxやphp7を用いるためにepelとremiのインストールを行う。
epel
yum install -y epel-release
sed -i.bk '/[epel]/,/^enabled/s/enabled=1/enabled=0/' /etc/yum.repos.d/epel.repo
remi
rpm --import http://rpms.famillecollet.com/RPM-GPG-KEY-remi
rpm -ivh http://rpms.famillecollet.com/enterprise/remi-release-7.rpm
2.Nginxのインストール
Webサーバとして利用するNginxをインストールする。
yum install -y --enablerepo=epel nginxサービスの起動設定、ファイアウォールのポート開放を行う。
systemctl restart nginx.service
systemctl enable nginx.service
firewall-cmd --permanent --zone=public --add-service=http
firewall-cmd --reload
3.MariaDBのインストール
以下のコマンドでMariaDBのインストールを行う。
yum install -y mariadb mariadb-serverサービスの起動設定、最低限のセキュリティ設定を実施する。
systemctl start mariadb.service
systemctl enable mariadb.service
mysql_secure_installation
[root@BS-PUB-CENT7-01 ~]# mysql_secure_installation
/usr/bin/mysql_secure_installation: 行 379: find_mysql_client: コマンドが見つかりません
NOTE: RUNNING ALL PARTS OF THIS SCRIPT IS RECOMMENDED FOR ALL MariaDB
SERVERS IN PRODUCTION USE! PLEASE READ EACH STEP CAREFULLY!
In order to log into MariaDB to secure it, we'll need the current
password for the root user. If you've just installed MariaDB, and
you haven't set the root password yet, the password will be blank,
so you should just press enter here.
Enter current password for root (enter for none):
OK, successfully used password, moving on...
Setting the root password ensures that nobody can log into the MariaDB
root user without the proper authorisation.
Set root password? [Y/n] Y
New password:
Re-enter new password:
Password updated successfully!
Reloading privilege tables..
... Success!
By default, a MariaDB installation has an anonymous user, allowing anyone
to log into MariaDB without having to have a user account created for
them. This is intended only for testing, and to make the installation
go a bit smoother. You should remove them before moving into a
production environment.
Remove anonymous users? [Y/n]
... Success!
Normally, root should only be allowed to connect from 'localhost'. This
ensures that someone cannot guess at the root password from the network.
Disallow root login remotely? [Y/n]
... Success!
By default, MariaDB comes with a database named 'test' that anyone can
access. This is also intended only for testing, and should be removed
before moving into a production environment.
Remove test database and access to it? [Y/n]
- Dropping test database...
... Success!
- Removing privileges on test database...
... Success!
Reloading the privilege tables will ensure that all changes made so far
will take effect immediately.
Reload privilege tables now? [Y/n]
... Success!
Cleaning up...
All done! If you've completed all of the above steps, your MariaDB
installation should now be secure.
Thanks for using MariaDB!
4.php7(+php-fpm)のインストール
最後に、php7のインストールを以下のコマンドで行う。
このとき、一緒にその他必要なパッケージ(php-fpmなど)も導入してしまう。
yum install -y --enablerepo=epel,remi-php70 php php-mbstring php-pear php-fpm php-mcrypt php-mysql[root@BS-PUB-CENT7-01 ~]# php -v
PHP 7.0.10 (cli) (built: Aug 31 2016 18:07:34) ( NTS )
Copyright (c) 1997-2016 The PHP Group
Zend Engine v3.0.0, Copyright (c) 1998-2016 Zend Technologies4-1.php-fpmの関連設定
php-fpmでは、デフォルトの設定だとapacheが実行グループとなっているので、nginxに切り替える対応が必要になる。
以下のコマンドを実行し、置換を行う。
sed -i.bk '/^[user|group]/s/apache/nginx/' /etc/php-fpm.d/www.confまた、php-fpmとNginxを連携させるため、Nginxの設定ファイルである「/etc/nginx/nginx.conf」というファイルを置き換える。
※VirtualHostでやるのであれば、別途「/etc/nginx/conf.d」配下に設定ファイルを作成することを推奨する。今回はテストなのでこのまま進める。
cat << "EOF" > /etc/nginx/conf.d/test.conf
# For more information on configuration, see:
#   * Official English Documentation: http://nginx.org/en/docs/
#   * Official Russian Documentation: http://nginx.org/ru/docs/

user nginx;
worker_processes auto;
error_log /var/log/nginx/error.log;
pid /run/nginx.pid;

events {
    worker_connections 1024;
}

http {
    log_format  main  '$remote_addr - $remote_user [$time_local] "$request" '
                      '$status $body_bytes_sent "$http_referer" '
                      '"$http_user_agent" "$http_x_forwarded_for"';

    access_log  /var/log/nginx/access.log  main;

    sendfile            on;
    tcp_nopush          on;
    tcp_nodelay         on;
    keepalive_timeout   65;
    types_hash_max_size 2048;

    include             /etc/nginx/mime.types;
    default_type        application/octet-stream;

    # Load modular configuration files from the /etc/nginx/conf.d directory.
    # See http://nginx.org/en/docs/ngx_core_module.html#include
    # for more information.
    include /etc/nginx/conf.d/*.conf;

    server {
        listen       80 default_server;
        listen       [::]:80 default_server;
        server_name  _;
        root         /usr/share/nginx/html;
        index index.php;

        # Load configuration files for the default server block.
        include /etc/nginx/default.d/*.conf;

        location / {
        }

        location ~ \.php$ {
            include /etc/nginx/fastcgi_params;
            fastcgi_pass 127.0.0.1:9000;
            fastcgi_index index.php;
            fastcgi_param SCRIPT_FILENAME /usr/share/nginx/html/test$fastcgi_script_name;
        }

        error_page 404 /404.html;
            location = /40x.html {
        }

        error_page 500 502 503 504 /50x.html;
            location = /50x.html {
        }
    }
}
EOF
作業完了後、php-fpmのサービス起動設定やNginxの再起動などを行う。
systemctl restart php-fpm.service
systemctl enable php-fpm.service
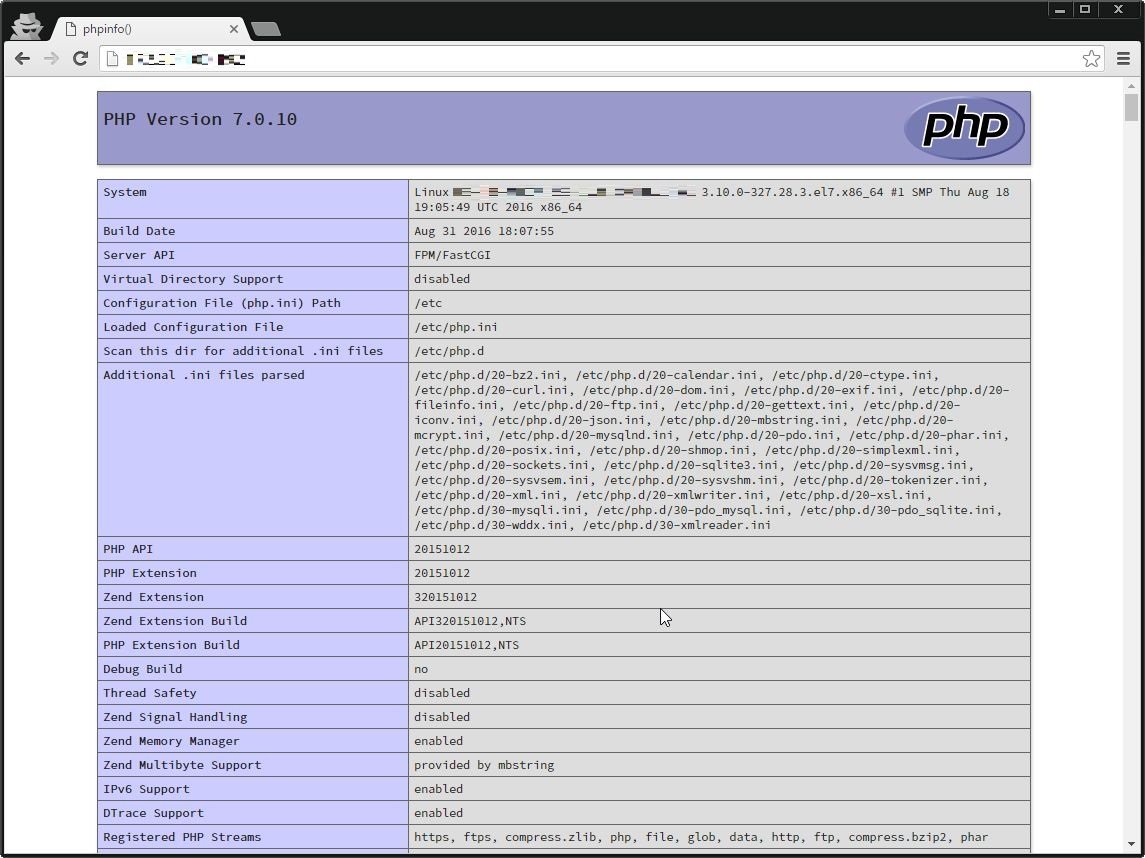
systemctl restart nginx.service最後に、ちゃんとNginxでphpが動作しているかを確認するため、phpinfoファイルを作成、ブラウザからアクセスする。
echo '<?php phpinfo(); ?>' > /usr/share/nginx/html/index.php