Rundeckでは対象のノードに処理を実施する場合、ssh接続してコマンドを実行するのだが、Windowsに対しジョブを実行する場合はWinRMを使うのがよさそうだ。
Windows 10とかならsshサーバも使えるようになったし、それ使えばいいんだろうけど、いかんせんWindows Server 2008/2012 R2などにはsshサーバの機能はない(OpenSSHとか入れればできる)。
できればWindowsとして提供されている機能でアクセスしたいなぁ…ということで、WinRMを用いての接続をする。
プラグインはこちら。なお、触ってみた限りRundeck側でスクリプトを書いて、それを転送して実行する使い方はできなそうだ。
スクリプトを実行する場合は、事前に転送しておいて対象のPATHを指定してキックするようにしよう。
1.Windows側でWinRMの設定
まずは、Windows側でWinRMの設定を行う。
winrm qcPS C:\Users\Administrator> winrm qc
WinRM サービスは、既にこのコンピューターで実行されています。
WinRM は、管理用にこのコンピューターへのリモート アクセスを許可するように設定されていません。
次の変更を行う必要があります:
ローカル ユーザーにリモートで管理権限を付与するよう LocalAccountTokenFilterPolicy を構成してください。
変更しますか [y/n]? y
WinRM はリモート管理用に更新されました。
ローカル ユーザーにリモートで管理権限を付与するよう LocalAccountTokenFilterPolicy を構成しました。次に、LinuxからWinRM経由でアクセスできるよう、Basic認証を許可する。
winrm set winrm/config/client/auth '@{Basic="true"}'
winrm set winrm/config/service/auth '@{Basic="true"}'
winrm set winrm/config/service '@{AllowUnencrypted="true"}'
PS C:\Users\Administrator> winrm set winrm/config/client/auth '@{Basic="true"}'
Auth
    Basic = true
    Digest = true
    Kerberos = true
    Negotiate = true
    Certificate = true
    CredSSP = false

PS C:\Users\Administrator> winrm set winrm/config/service/auth '@{Basic="true"}'
Auth
    Basic = true
    Kerberos = true
    Negotiate = true
    Certificate = false
    CredSSP = false
    CbtHardeningLevel = Relaxed

PS C:\Users\Administrator> winrm set winrm/config/service '@{AllowUnencrypted="true"}'
Service
    RootSDDL = O:NSG:BAD:P(A;;GA;;;BA)(A;;GR;;;IU)S:P(AU;FA;GA;;;WD)(AU;SA;GXGW;;;WD)
    MaxConcurrentOperations = 4294967295
    MaxConcurrentOperationsPerUser = 1500
    EnumerationTimeoutms = 240000
    MaxConnections = 300
    MaxPacketRetrievalTimeSeconds = 120
    AllowUnencrypted = true
    Auth
        Basic = true
        Kerberos = true
        Negotiate = true
        Certificate = false
        CredSSP = false
        CbtHardeningLevel = Relaxed
    DefaultPorts
        HTTP = 5985
        HTTPS = 5986
    IPv4Filter = *
    IPv6Filter = *
    EnableCompatibilityHttpListener = false
    EnableCompatibilityHttpsListener = false
    CertificateThumbprint
    AllowRemoteAccess = true
これで、Windows側の設定は完了。
2.Rundeck側の設定
次に、Rundeck側の設定を行う。
まず、以下のコマンドでプラグインのjarファイルを適切なPATHに配置する。
wget https://github.com/rundeck-plugins/rundeck-winrm-plugin/releases/download/v1.3.3/rundeck-winrm-plugin-1.3.3.jar -P /var/lib/rundeck/libext/
chown -R rundeck. /var/lib/rundeck/libext/
次に、リモートノードとして追加するため、「/var/rundeck/projects/プロジェクト名/etc/resources.xml」に以下のように追記する。
<project>
  <node name="localhost" description="Rundeck server node" tags="" hostname="localhost" osArch="amd64" osFamily="unix" osName="Linux" osVersion="3.10.0-327.el7.x86_64" username="rundeck"/>
  ...
  <node name="サーバ名" connectionType="WINRM_NATIVE" node-executor="overthere-winrm" winrm-password-option="winrmPassword" winrm-protocol="https" winrm-auth-type="basic" username="ユーザ名" winrmPassword="パスワード" hostname="IPアドレス:5986"/></span>
</project>
設定記述後、サービスを再起動する。
systemctl restart rundeckd3.ジョブの作成
次に、ジョブの作成を行う。
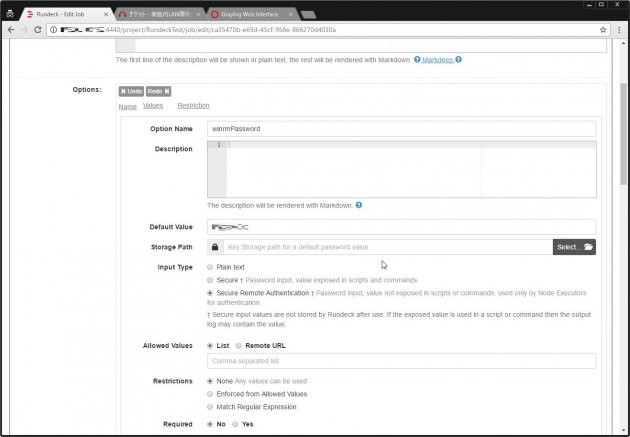
基本的には通常のジョブ作成とたいして変わらないのだが、オプションとして「winrmPassword」という項目を作成して、デフォルト値に接続用のパスワードを入れる必要がある。
設定したら、あとはジョブを実行するだけだ。
とりあえず、hostnameコマンドなどを実行した結果が以下。
無事、ジョブが実行できた。
ほかでWinRMを利用しないのであれば、ファイアウォールなどでRundeckホスト以外からの対象ポートへのアクセスは制限しておくといいだろう。

