
以前、モニタリングコマンド『nmon』を紹介したが、今回は同様に便利な『Glances』というコマンドについて紹介する。
このコマンドの特徴としては、多くの情報をひと目で確認出来るということだ。
さて、それでは早速インストールをしてみよう。
以下のコマンドを実行する事で、インストールが行える。
sudo apt-get install python-pip build-essential python-dev
sudo pip install Glances
sudo pip install PySensors
インストール完了後、以下のコマンドで『Glances』を実行する。
glances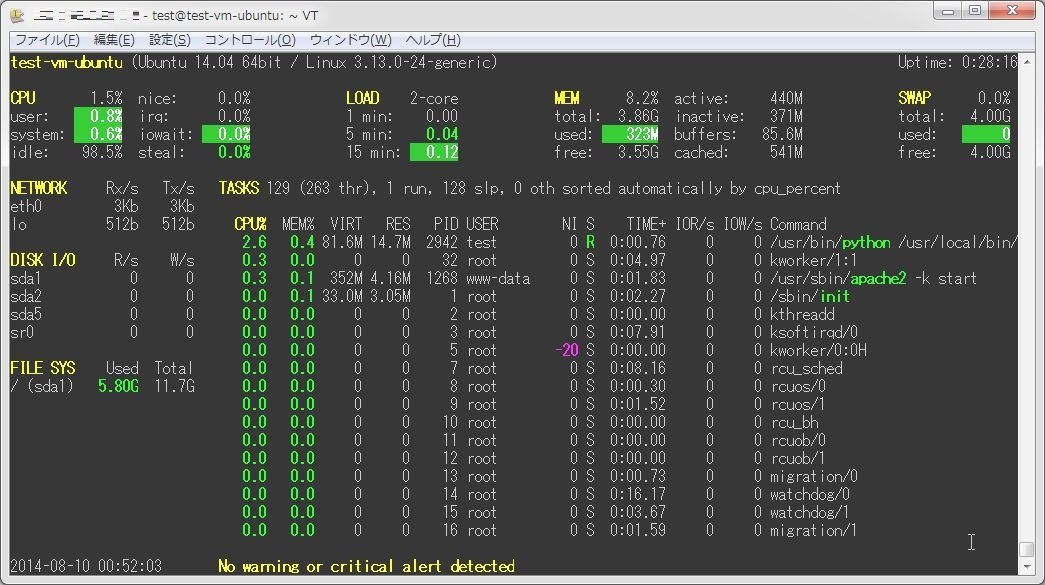
ぱっと見で多くの情報を参照出来て、かなり便利なコマンドだ。
これはいいね!!
他には、どんな事が出来るんだろう?ヘルプの内容を見てみよう。
test@test-vm-ubuntu:~$ glances -h
usage: glances [-h] [-V] [-b] [-B BIND_ADDRESS] [-c CLIENT] [-C CONF_FILE]
               [--disable-bold] [--disable-diskio] [--disable-fs]
               [--disable-network] [--disable-sensors] [--disable-process]
               [--disable-log] [--output-csv OUTPUT_CSV] [-p PORT]
               [--password-badidea PASSWORD_ARG] [--password] [-s]
               [--snmp-community SNMP_COMMUNITY] [--snmp-port SNMP_PORT]
               [--snmp-version SNMP_VERSION] [--snmp-user SNMP_USER]
               [--snmp-auth SNMP_AUTH] [-t TIME] [-w] [-1]

optional arguments:
  -h, --help            show this help message and exit
  -V, --version         show program's version number and exit
  -b, --byte            display network rate in byte per second
  -B BIND_ADDRESS, --bind BIND_ADDRESS
                        bind server to the given IPv4/IPv6 address or hostname
  -c CLIENT, --client CLIENT
                        connect to a Glances server by IPv4/IPv6 address or
                        hostname
  -C CONF_FILE, --config CONF_FILE
                        path to the configuration file
  --disable-bold        disable bold mode in the terminal
  --disable-diskio      disable disk I/O module
  --disable-fs          disable filesystem module
  --disable-network     disable network module
  --disable-sensors     disable sensors module
  --disable-process     disable process module
  --disable-log         disable log module
  --output-csv OUTPUT_CSV
                        export stats to a CSV file
  -p PORT, --port PORT  define the client/server TCP port [default: 61209]
  --password-badidea PASSWORD_ARG
                        define password from the command line
  --password            define a client/server password from the prompt or
                        file
  -s, --server          run Glances in server mode
  --snmp-community SNMP_COMMUNITY
                        SNMP community
  --snmp-port SNMP_PORT
                        SNMP port
  --snmp-version SNMP_VERSION
                        SNMP version (1, 2c or 3)
  --snmp-user SNMP_USER
                        SNMP username (only for SNMPv3)
  --snmp-auth SNMP_AUTH
                        SNMP authentication key (only for SNMPv3)
  -t TIME, --time TIME  set refresh time in seconds [default: 3 sec]
  -w, --webserver       run Glances in web server mode
  -1, --percpu          start Glances in per CPU mode
ほうほう、どうやらサーバモードとクライアントモードを用いる事で、別のマシンもモニタリング出来るようだ。
モニタリングしたいマシンで「-s」オプションを用いておき、クライアントマシンで以下のようにコマンドを実行すればいいようだ。
glances -c サーバのホスト名/IPアドレスこれは便利だ。
補足
なお、CentOSへのインストールはEPELを有効にすればyumからインストール可能だ。
sudo yum install glances --enablerepo=epel
