今回は、CentOS 7でApacheをソースからインストールし、複数のインスタンスを構成させる。
1.Apacheのインストール
まずは、Apacheのインストールから行う。
以下のコマンドを実行し、コンパイルに必要となるパッケージをインストールする。
yum install wget gcc pcre-devel次に、Apacheのコンパイルに必要となるAprおよびApr-Utilをコンパイルする。
cd /opt
mkdir apr apr-util
cd apr
wget http://ftp.jaist.ac.jp/pub/apache/apr/apr-1.5.2.tar.gz
tar -xvzf apr-1.5.2.tar.gz
cd apr-1.5.2
./configure --prefix=/opt/apr
make && make install
cd ../../apr-util
wget http://ftp.jaist.ac.jp/pub/apache/apr/apr-util-1.5.4.tar.gz
tar -xvzf apr-util-1.5.4.tar.gz
cd apr-util-1.5.4
./configure --prefix=/opt/apr-util --with-apr=/opt/apr
make && make install
終わったら、以下のコマンドでhttpd01及びhttpd02をインストールする。
インストールPATHはそれぞれ「/opt/httpd01」「/opt/httpd02」とする。
httpd01
cd /opt
mkdir httpd01
wget http://ftp.yz.yamagata-u.ac.jp/pub/network/apache/httpd/httpd-2.4.12.tar.gz
tar zxvf httpd-2.4.12.tar.gz
cd httpd-2.4.12
./configure --prefix=/opt/httpd01 \
--enable-rewrite=shared \
--enable-speling=shared \
--enable-so \
--with-apr=/opt/apr \
--with-apr-util=/opt/apr-util
make && make install
httpd02
cd /opt
mkdir httpd02
cd httpd-2.4.12
make clean
./configure --prefix=/opt/httpd02 \
--enable-rewrite=shared \
--enable-speling=shared \
--enable-so \
--with-apr=/opt/apr \
--with-apr-util=/opt/apr-util
make && make install
Apache以外でもそうだが、ソースからインストールする場合は「--prefix」でインストールPATHを指定する。
2.httpd.confの設定
次に、httpd01、httpd02それぞれのhttpd.confを設定する。
といっても、今回は検証のみなので、ListenとVirtualHostの設定のみだ。以下、編集した箇所だけを記述。
なお、httpd.confは別の箇所について再度編集を行う。
httpd.conf(httpd01)
Listen 192.168.0.221:80
<VirtualHost 192.168.0.221:80>
  ServerName httpd01
  DocumentRoot htdocs/
</VirtualHost>
httpd.conf(httpd02)
Listen 192.168.0.222:80
<VirtualHost 192.168.0.222:80>
  ServerName httpd02
  DocumentRoot htdocs/
</VirtualHost>
3.起動スクリプトの設定
最後に、起動スクリプトの設定を行う。
CentOS 7の場合、init.dからsystemdになったので、起動スクリプトも今までの書き方ではない。
インスタンスごとに、以下の内容でファイルを配置する。
今回は細かい設定は行わず、とりあえず起動する状態にする。
/etc/systemd/system/httpd01.service
[Unit]
Description=Apache Web Server 01
After=network.target remote-fs.target nss-lookup.target

[Service]
Type=forking
ExecStart=/opt/httpd01/bin/apachectl start
ExecStop=/opt/httpd01/bin/apachectl graceful-stop
ExecReload=/opt/httpd01/bin/apachectl graceful
PrivateTmp=true
LimitNOFILE=infinity

[Install]
WantedBy=multi-user.target
/etc/systemd/system/httpd02.service
[Unit]
Description=Apache Web Server 02
After=network.target remote-fs.target nss-lookup.target

[Service]
Type=forking
ExecStart=/opt/httpd02/bin/apachectl start
ExecStop=/opt/httpd02/bin/apachectl graceful-stop
ExecReload=/opt/httpd02/bin/apachectl graceful
PrivateTmp=true
LimitNOFILE=infinity

[Install]
WantedBy=multi-user.target
/usr/lib/systemd/system/httpd02.service
[Unit]
Description=Apache Web Server 02
After=network.target remote-fs.target nss-lookup.target
[Service]
Type=forking
ExecStart=/opt/httpd02/bin/apachectl start
ExecStop=/opt/httpd02/bin/apachectl graceful-stop
ExecReload=/opt/httpd02/bin/apachectl graceful
PrivateTmp=true
LimitNOFILE=infinity
[Install]
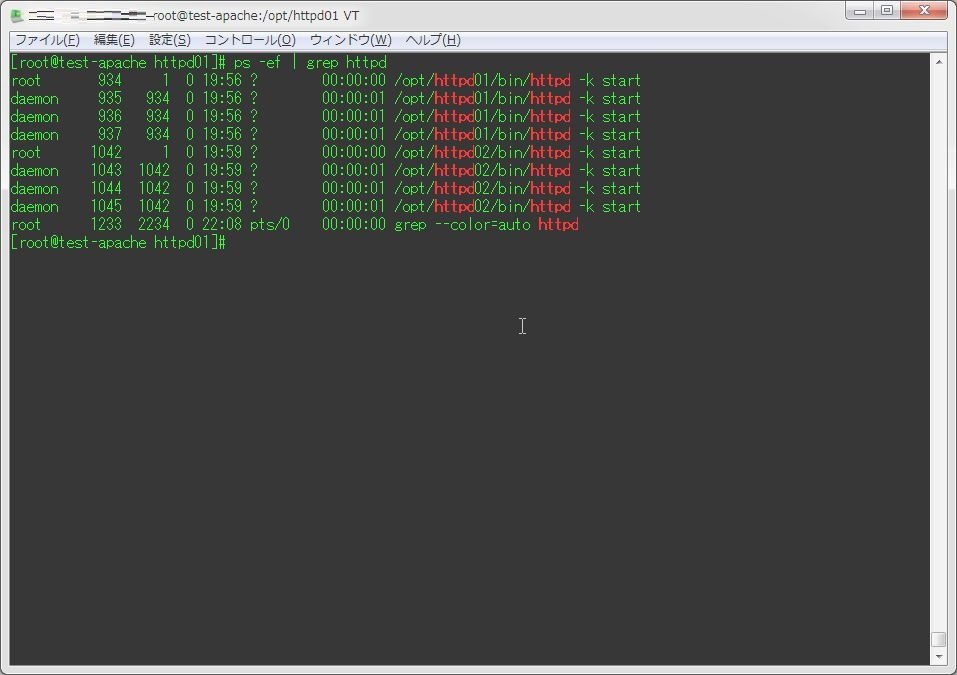
WantedBy=multi-user.target後は、以下のコマンドでサービスの起動と自動起動設定を行う。
systemctl daemon-reload
systemctl start httpd01.service
systemctl start httpd02.service
systemctl enable httpd01.service
systemctl enable httpd02.service
これで、CentOS 7でもApacheを複数インスタンスで動作させる事が出来る。