を構築する① インストール編")
一定の規模を持つWindows環境を構築する上で、無くてはならないのがActive Directoryだ。 そのActive Directoryを使う上で欠かせないDomain Controllerだが、実はSamba 4で構築可能となったのだ。
今までのバージョンでは別途必要であったLDAPサーバやDNSサーバの導入も不要となっており、Samba 4でのDomain Contorllerでのドメインの連動テストにはMicrosoftも協力していることから、普通に利用する分には問題なく動作するだろう事が伺える。
それでは、早速インストールをしてみよう。なお、今回の構築・検証はこちらのサイトを参考に進めていく。 (いつも参考にさせていただいてます)
Active Directoryを利用する上で、事前に以下の内容を定めておく必要がある。
- AD DCサーバのホスト名
- ドメイン名
- レルム
ここでは、以下の内容で設定を行う。
- ホスト名:dctest01
- ドメイン名:TESTAD
- レルム:TESTAD.LOCAL
1.事前準備
まずは事前準備から。 CentOS 7上でホスト名の設定、及び前提となるパッケージのインストールを行う。
ホスト名の設定
echo ホスト名 > /etc/hostname
echo "HOSTNAME=ホスト名" >> /etc/sysconfig/network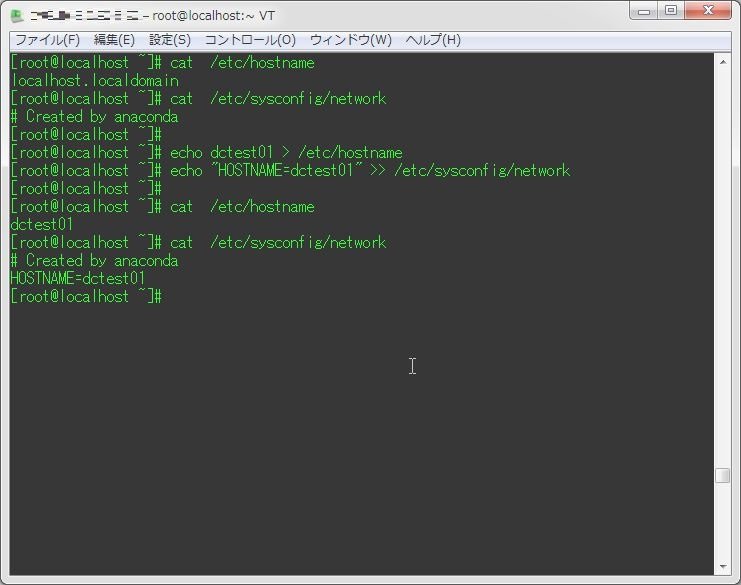
[root@localhost ~]# cat  /etc/hostname
localhost.localdomain
[root@localhost ~]# cat  /etc/sysconfig/network
# Created by anaconda
[root@localhost ~]#
[root@localhost ~]# echo dctest01 > /etc/hostname
[root@localhost ~]# echo "HOSTNAME=dctest01" >> /etc/sysconfig/network
[root@localhost ~]#
[root@localhost ~]# cat  /etc/hostname
dctest01
[root@localhost ~]# cat  /etc/sysconfig/network
# Created by anaconda
HOSTNAME=dctest01
[root@localhost ~]#
上記コマンド実行後、再起動を行いホスト名の変更を適用する。
reboot次に、yumからインストールできるsamba 4だとDomain Controlerになれないため、Samba 4をmakeする際に必要となるパッケージを導入する。 yumが利用できる環境であれば、以下のコマンドでインストールする。
yum -y install perl gcc libacl-devel libblkid-devel gnutls-devel \
readline-devel python-devel gdb pkgconfig krb5-workstation \
zlib-devel setroubleshoot-server libaio-devel \
setroubleshoot-plugins policycoreutils-python \
libsemanage-python setools-libs-python setools-libs \
popt-devel libpcap-devel sqlite-devel libidn-devel \
libxml2-devel libacl-devel libsepol-devel libattr-devel \
keyutils-libs-devel cyrus-sasl-devel cups-devel bind-utils \
libxslt docbook-style-xsl openldap-devel
インターネット接続が利用出来ない環境であれば、以下のパッケージをダウンロードしてくると良いだろう。
- perl-5.16.3-283.el7.x86_64.rpm
- pkgconfig-0.27.1-4.el7.x86_64.rpm
- libxslt-1.1.28-5.el7.x86_64.rpm
- audit-libs-python-2.3.3-4.el7.x86_64.rpm
- bind-libs-9.9.4-14.el7_0.1.x86_64.rpm
- bind-utils-9.9.4-14.el7_0.1.x86_64.rpm
- checkpolicy-2.1.12-6.el7.x86_64.rpm
- cpp-4.8.2-16.2.el7_0.x86_64.rpm
- cups-devel-1.6.3-14.el7.x86_64.rpm
- cyrus-sasl-2.1.26-17.el7.x86_64.rpm
- cyrus-sasl-devel-2.1.26-17.el7.x86_64.rpm
- docbook-dtds-1.0-60.el7.noarch.rpm
- docbook-style-xsl-1.78.1-3.el7.noarch.rpm
- gcc-4.8.2-16.2.el7_0.x86_64.rpm
- gdb-7.6.1-51.el7.x86_64.rpm
- glibc-devel-2.17-55.el7_0.5.x86_64.rpm
- glibc-headers-2.17-55.el7_0.5.x86_64.rpm
- gnutls-c++-3.1.18-10.el7_0.x86_64.rpm
- gnutls-dane-3.1.18-10.el7_0.x86_64.rpm
- gnutls-devel-3.1.18-10.el7_0.x86_64.rpm
- kernel-headers-3.10.0-123.20.1.el7.x86_64.rpm
- keyutils-libs-devel-1.5.8-3.el7.x86_64.rpm
- krb5-devel-1.11.3-49.el7.x86_64.rpm
- krb5-workstation-1.11.3-49.el7.x86_64.rpm
- ldns-1.6.16-7.el7.x86_64.rpm
- libacl-devel-2.2.51-12.el7.x86_64.rpm
- libaio-devel-0.3.109-12.el7.x86_64.rpm
- libattr-devel-2.4.46-12.el7.x86_64.rpm
- libblkid-devel-2.23.2-16.el7.x86_64.rpm
- libcgroup-0.41-6.el7.x86_64.rpm
- libcom_err-devel-1.42.9-4.el7.x86_64.rpm
- libevent-2.0.21-4.el7.x86_64.rpm
- libidn-devel-1.28-3.el7.x86_64.rpm
- libmpc-1.0.1-3.el7.x86_64.rpm
- libpcap-devel-1.5.3-3.el7_0.1.x86_64.rpm
- libselinux-devel-2.2.2-6.el7.x86_64.rpm
- libsemanage-python-2.1.10-16.el7.x86_64.rpm
- libsepol-devel-2.1.9-3.el7.x86_64.rpm
- libtasn1-devel-3.3-5.el7_0.x86_64.rpm
- libuuid-devel-2.23.2-16.el7.x86_64.rpm
- libverto-devel-0.2.5-4.el7.x86_64.rpm
- libxml2-devel-2.9.1-5.el7_0.1.x86_64.rpm
- libxml2-python-2.9.1-5.el7_0.1.x86_64.rpm
- mpfr-3.1.1-4.el7.x86_64.rpm
- ncurses-devel-5.9-13.20130511.el7.x86_64.rpm
- openssl-devel-1.0.1e-34.el7_0.7.x86_64.rpm
- p11-kit-devel-0.18.7-4.el7.x86_64.rpm
- pcre-devel-8.32-12.el7.x86_64.rpm
- policycoreutils-python-2.2.5-11.el7_0.1.x86_64.rpm
- popt-devel-1.13-16.el7.x86_64.rpm
- python-IPy-0.75-6.el7.noarch.rpm
- python-devel-2.7.5-16.el7.x86_64.rpm
- readline-devel-6.2-9.el7.x86_64.rpm
- setools-libs-3.3.7-46.el7.x86_64.rpm
- setroubleshoot-plugins-3.0.59-1.el7.noarch.rpm
- setroubleshoot-server-3.2.17-2.el7.x86_64.rpm
- sgml-common-0.6.3-39.el7.noarch.rpm
- sqlite-devel-3.7.17-4.el7.x86_64.rpm
- systemd-python-208-11.el7_0.6.x86_64.rpm
- unbound-libs-1.4.20-19.el7.x86_64.rpm
- xml-common-0.6.3-39.el7.noarch.rpm
- xz-devel-5.1.2-8alpha.el7.x86_64.rpm
- zlib-devel-1.2.7-13.el7.x86_64.rpm
- openldap-devel-2.4.39-3.el7.x86_64
パッケージのダウンロードは、インターネットに接続されている環境で以下のコマンドを実行する事で、「/tmp」配下にダウンロードできる。
yum -y install --downloadonly --downloaddir=/tmp perl gcc libacl-devel libblkid-devel gnutls-devel \
readline-devel python-devel gdb pkgconfig krb5-workstation \
zlib-devel setroubleshoot-server libaio-devel \
setroubleshoot-plugins policycoreutils-python \
libsemanage-python setools-libs-python setools-libs \
popt-devel libpcap-devel sqlite-devel libidn-devel \
libxml2-devel libacl-devel libsepol-devel libattr-devel \
keyutils-libs-devel cyrus-sasl-devel cups-devel bind-utils \
libxslt docbook-style-xsl openldap-devel
上記ファイルをインストール先マシンの適当なディレクトリに入れ、以下のコマンドでカレントディレクトリ配下のパッケージをインストールする。
yum localinstall --nogpgcheck ./*.rpm2.Samba 4のインストール
次に、Samba 4のインストールを実施する。 インターネット環境につながっているのであれば、以下のコマンドでtarファイルを取得、解凍しインストールを行う。
mkdir /tmp/samba
wget http://www.samba.org/samba/ftp/samba-latest.tar.gz -P /tmp
tar zxvf /tmp/samba-latest.tar.gz -C /tmp/samba/
cd /tmp/samba/samba-*
./configure && make && make install
5行目のコマンド(./configure && make && make install)は10分以上かかるので、気長に待つといいだろう。 終了すると、以下のように出力される。
…
Waf: Leaving directory `/tmp/samba/samba-4.2.0/bin'
'install' finished successfully (6m47.756s)
これでパッケージのインストールが完了した。 終了後、いらないパッケージの削除を行う。
cd
rm -f /tmp/samba-latest.tar.gz
rm -rf /tmp/samba
3.Samba 4の設定
Samba 4のインストールが完了したら、次は以下のようにsamba-toolコマンドを実行し、ドメイン設定を行う。
/usr/local/samba/bin/samba-tool domain provision --use-rfc2307 --interactive --function-level=2008_R2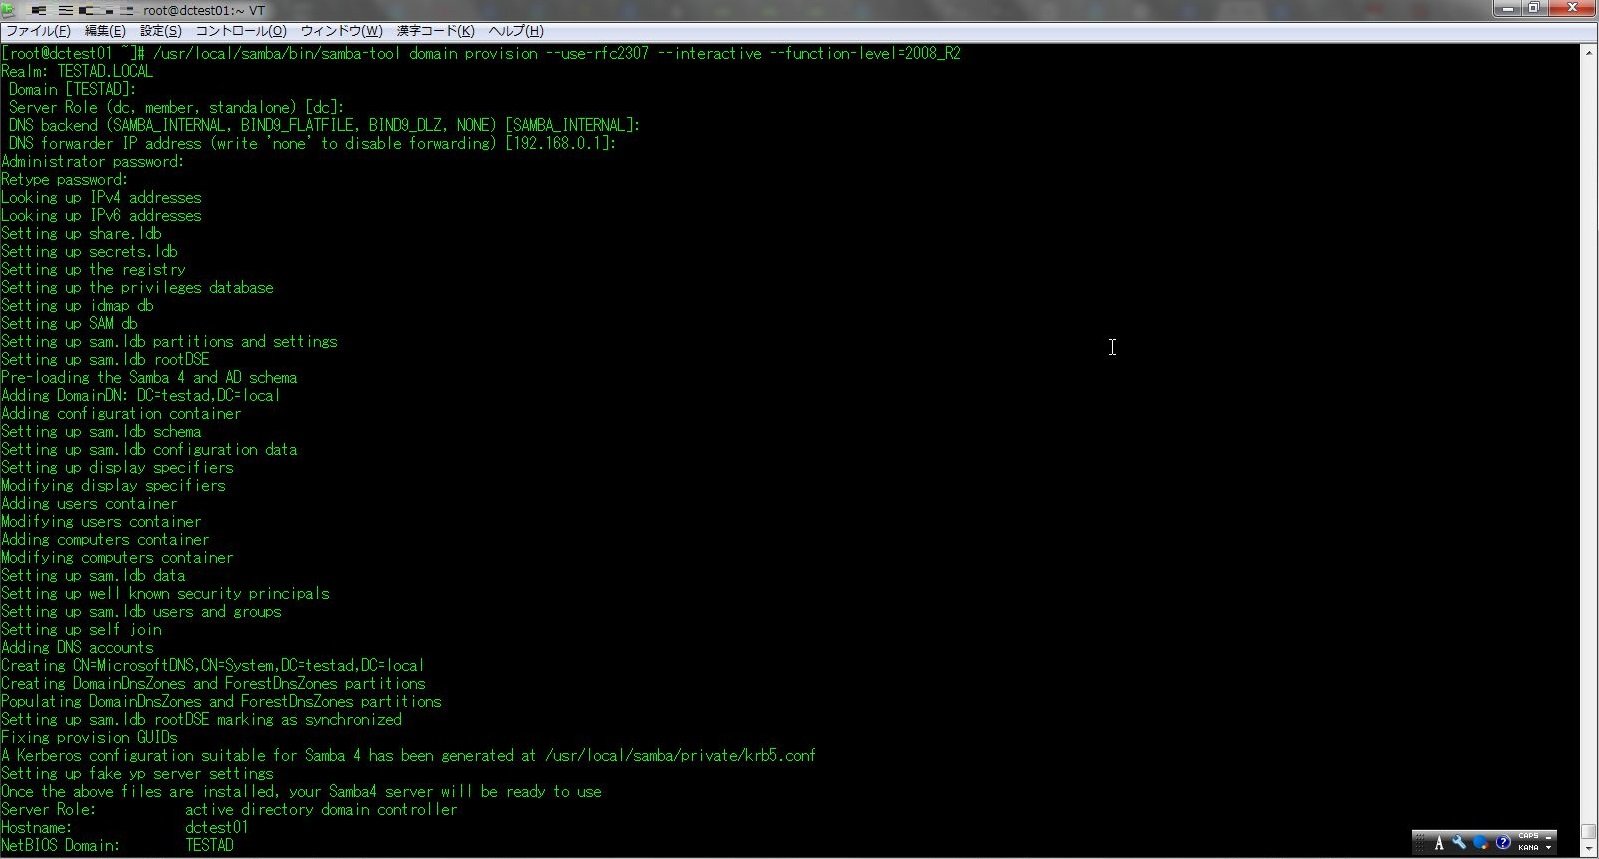
[root@dctest01 ~]# /usr/local/samba/bin/samba-tool domain provision --use-rfc2307 --interactive --function-level=2008_R2
Realm: TESTAD.LOCAL (先ほど定めたレルム名を入力)
 Domain [TESTAD]: (Enterキー)
 Server Role (dc, member, standalone) [dc]: (Enterキー)
 DNS backend (SAMBA_INTERNAL, BIND9_FLATFILE, BIND9_DLZ, NONE) [SAMBA_INTERNAL]: (Enterキー)
 DNS forwarder IP address (write 'none' to disable forwarding) [192.168.0.1]: (Enterキー)
Administrator password: (Samba4管理パスワード)
Retype password: (Samba4管理パスワード(再入力))
Looking up IPv4 addresses
Looking up IPv6 addresses
Setting up share.ldb
Setting up secrets.ldb
Setting up the registry
Setting up the privileges database
Setting up idmap db
Setting up SAM db
Setting up sam.ldb partitions and settings
Setting up sam.ldb rootDSE
Pre-loading the Samba 4 and AD schema
Adding DomainDN: DC=testad,DC=local
Adding configuration container
Setting up sam.ldb schema
Setting up sam.ldb configuration data
Setting up display specifiers
Modifying display specifiers
Adding users container
Modifying users container
Adding computers container
Modifying computers container
Setting up sam.ldb data
Setting up well known security principals
Setting up sam.ldb users and groups
Setting up self join
Adding DNS accounts
Creating CN=MicrosoftDNS,CN=System,DC=testad,DC=local
Creating DomainDnsZones and ForestDnsZones partitions
Populating DomainDnsZones and ForestDnsZones partitions
Setting up sam.ldb rootDSE marking as synchronized
Fixing provision GUIDs
A Kerberos configuration suitable for Samba 4 has been generated at /usr/local/samba/private/krb5.conf
Setting up fake yp server settings
Once the above files are installed, your Samba4 server will be ready to use
Server Role:           active directory domain controller
Hostname:              dctest01
NetBIOS Domain:        TESTAD
DNS Domain:            testad.local
DOMAIN SID:            S-1-5-21-906124497-132372182-3774010423
これでドメインの設定が完了した。 もしドメイン設定をやり直す場合は、以下のコマンドでドメインの設定ファイルを削除すると良いらしい。
rm -f /usr/local/samba/etc/smb.conf
rm -rf /usr/local/samba/private/*
rm -rf /usr/local/samba/var/locks/sysvol/*
4.Samba 4の起動
まずは、OS起動時にsambaが自動起動するように起動スクリプトを作成する。
/etc/rc.d/init.d/samba4
#!/bin/bash
#
# samba4        This shell script takes care of starting and stopping
#               samba4 daemons.
#
# chkconfig: - 58 74
# description: Samba 4.0 will be the next version of the Samba suite
# and incorporates all the technology found in both the Samba4 alpha
# series and the stable 3.x series. The primary additional features
# over Samba 3.6 are support for the Active Directory logon protocols
# used by Windows 2000 and above.

# BEGIN INIT INFO
# Provides: samba4
# Required-Start: $network $local_fs $remote_fs
# Required-Stop: $network $local_fs $remote_fs
# Should-Start: $syslog $named
# Should-Stop: $syslog $named
# Short-Description: start and stop samba4
# Description: Samba 4.0 will be the next version of the Samba suite
# and incorporates all the technology found in both the Samba4 alpha
# series and the stable 3.x series. The primary additional features
# over Samba 3.6 are support for the Active Directory logon protocols
# used by Windows 2000 and above.
# END INIT INFO

# Source function library.
. /etc/init.d/functions

# Source networking configuration.
. /etc/sysconfig/network

prog=samba
prog_dir=/usr/local/samba/sbin/
lockfile=/var/lock/subsys/$prog

start() {
        [ "$NETWORKING" = "no" ] && exit 1
#       [ -x /usr/sbin/ntpd ] || exit 5

                # Start daemons.
                echo -n $"Starting samba4: "
                daemon $prog_dir/$prog -D
        RETVAL=$?
                echo
        [ $RETVAL -eq 0 ] && touch $lockfile
        return $RETVAL
}

stop() {
        [ "$EUID" != "0" ] && exit 4
                echo -n $"Shutting down samba4: "
        killproc $prog_dir/$prog
        RETVAL=$?
                echo
        [ $RETVAL -eq 0 ] && rm -f $lockfile
        return $RETVAL
}

# See how we were called.
case "$1" in
start)
        start
        ;;
stop)
        stop
        ;;
status)
        status $prog
        ;;
restart)
        stop
        start
        ;;
reload)
        echo "Not implemented yet."
        exit 3
        ;;
*)
        echo $"Usage: $0 {start|stop|status|restart|reload}"
        exit 2
esac
起動スクリプト作成後、以下のコマンドで実行権限・サービス自動起動設定などを行う。
chmod 755 /etc/rc.d/init.d/samba4
chmod +x /etc/rc.d/init.d/samba4
ln -s /etc/rc.d/init.d/samba4 /etc/rc3.d/S80samba4
chkconfig samba4 on && systemctl start samba4
5.DNSの設定
ドメイン作成後、DNSが正常に動作しないとDCとして機能しないため、DNSの設定を行う。 以下のコマンドで、DNSサーバの参照先を自分自身にする。
echo "nameserver 127.0.0.1" > /etc/resolv.conf
sed -i "/^DNS1/cDNS1=127.0.0.1" /etc/sysconfig/network-scripts/ifcfg-*
systemctl restart network
上記設定後、DNSの動作テストを行う。 以下のコマンドを実行し、正常に動作していることを確認する。
/usr/local/samba/bin/samba-tool dns zonelist 127.0.0.1 -U Administrator
host -t SRV _ldap._tcp.レルム名 127.0.0.1
host -t SRV _kerberos._udp.レルム名 127.0.0.1
host -t A ホスト名(ドメイン付き) 127.0.0.1
各コマンドの実際の実行結果が以下。
DNSのZONEの確認
[root@dctest01 ~]# /usr/local/samba/bin/samba-tool dns zonelist 127.0.0.1 -U Administrator
Password for [TESTAD\Administrator]:
  2 zone(s) found

  pszZoneName                 : testad.local
  Flags                       : DNS_RPC_ZONE_DSINTEGRATED DNS_RPC_ZONE_UPDATE_SECURE
  ZoneType                    : DNS_ZONE_TYPE_PRIMARY
  Version                     : 50
  dwDpFlags                   : DNS_DP_AUTOCREATED DNS_DP_DOMAIN_DEFAULT DNS_DP_ENLISTED
  pszDpFqdn                   : DomainDnsZones.testad.local

  pszZoneName                 : _msdcs.testad.local
  Flags                       : DNS_RPC_ZONE_DSINTEGRATED DNS_RPC_ZONE_UPDATE_SECURE
  ZoneType                    : DNS_ZONE_TYPE_PRIMARY
  Version                     : 50
  dwDpFlags                   : DNS_DP_AUTOCREATED DNS_DP_FOREST_DEFAULT DNS_DP_ENLISTED
  pszDpFqdn                   : ForestDnsZones.testad.local
DNSのレコードの確認
[root@dctest01 ~]# host -t SRV _ldap._tcp.testad.local 127.0.0.1
Using domain server:
Name: 127.0.0.1
Address: 127.0.0.1#53
Aliases:

_ldap._tcp.testad.local has SRV record 0 100 389 dctest01.testad.local.
[root@dctest01 ~]# host -t SRV _kerberos._udp.testad.local 127.0.0.1
Using domain server:
Name: 127.0.0.1
Address: 127.0.0.1#53
Aliases:

_kerberos._udp.testad.local has SRV record 0 100 88 dctest01.testad.local.
[root@dctest01 ~]# host -t A dctest01.testad.local 127.0.0.1
Using domain server:
Name: 127.0.0.1
Address: 127.0.0.1#53
Aliases:

dctest01.testad.local has address 192.168.0.226
これで、DNSの設定は出来た。
6.Kerberosの設定
次に、Kerberosの設定を行う。 以下のコマンドを実行し、設定ファイルをコピーする。
cp /usr/local/samba/private/krb5.conf /etc/krb5.conf[root@dctest01 ~]# cp /usr/local/samba/private/krb5.conf /etc/krb5.conf
cp: `/etc/krb5.conf' を上書きしますか? yesKeroberosの動作テストを行う。
kinit administrator@レルム名(大文字)[root@dctest01 ~]# kinit administrator@TESTAD.LOCAL
Password for administrator@TESTAD.LOCAL:
Warning: Your password will expire in 41 days on 2015年04月26日 17時31分17秒以下のようなメッセージが出た場合、DNS名が間違っているか、入力したレルム名が誤っている可能性がある。
kinit: Cannot resolve servers for KDC in realm "レルム名" while getting initial credentials7.Firewalled・SELinuxの設定
外部のマシンから接続できるよう、ファイアウォールの設定を行う。 ファイアウォール自体が不要の場合は、以下のコマンドで停止設定を行う。
systemctl stop firewalld
systemctl disable firewalld
ファイアウォールを有効化したままで利用するのであれば、以下のコマンドを実行する。
firewall-cmd --permanent --zone=public --add-service=samba
firewall-cmd --permanent --zone=public --add-service=kerberos
firewall-cmd --permanent --zone=public --add-service=ldap
firewall-cmd --permanent --zone=public --add-service=ldaps
firewall-cmd --permanent --zone=public --add-service=dns
firewall-cmd --permanent --zone=public --add-service=ntp
firewall-cmd --permanent --zone=public --add-port=135/tcp
firewall-cmd --permanent --zone=public --add-port=3268/tcp
firewall-cmd --permanent --zone=public --add-port=3269/tcp
firewall-cmd --permanent --zone=public --add-port=1024/tcp
firewall-cmd --permanent --zone=public --add-port=24542/tcp
firewall-cmd --permanent --zone=public --add-port=1024-65535/tcp
firewall-cmd --reload
さらに、SELinuxでの有効化設定も必要になる。 SELinux自体が不要であれば、以下のコマンドで無効化する。
setenforce 0
sed -i.bak "/SELINUX/s/enforcing/disabled/g" /etc/selinux/config
SELinuxを利用した上でSamba 4を利用するのであれば、以下のコマンドを実行する。
setsebool -P samba_domain_controller on
setsebool -P samba_export_all_ro on
setsebool -P samba_export_all_rw on
setsebool -P samba_enable_home_dirs o
8.ドメインでのログイン
さて、それでは実際にドメインを利用してWindowsでログインしてみよう。 Windows 側で、DNSサーバを構築したAC DCサーバに設定し、「コンピュータ名/ドメイン名の変更」でドメインにログインしてみる。 すると…
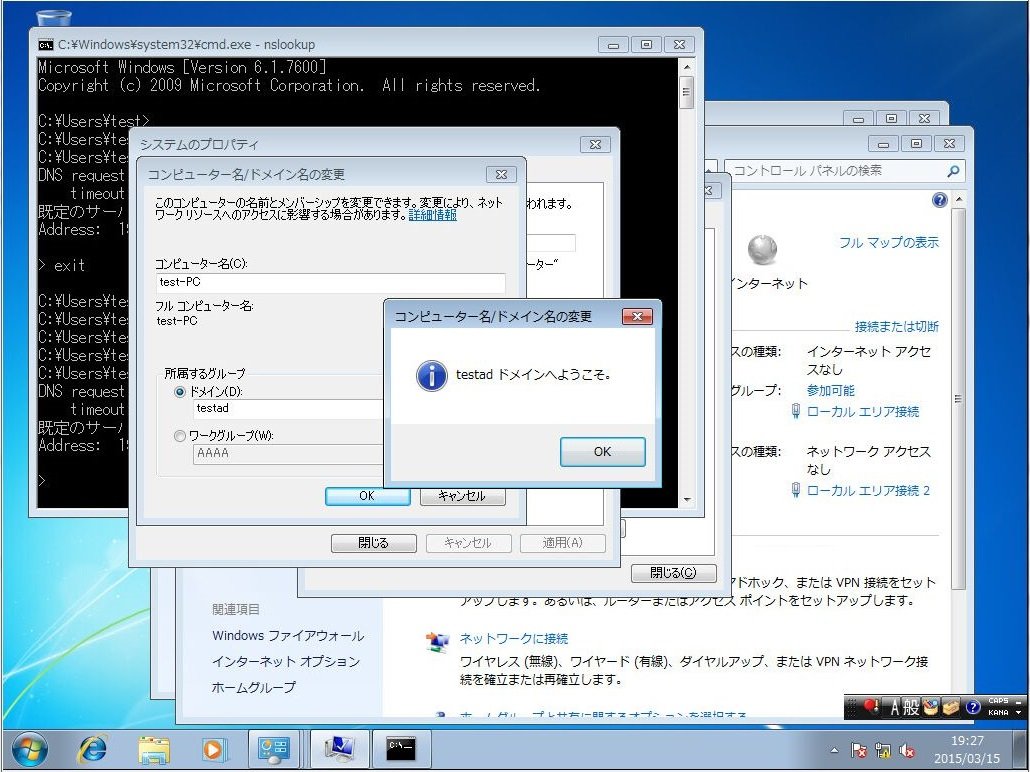
無事、ログインすることが出来た。 後は、再起動後にドメインによるログインを行うだけだ。
グループポリシーの設定やユーザの追加、Windows 7からの管理ツールの導入などについてはまた次回以降に触れていく。
※なお、私の環境(DC、クライアントともに仮想マシン)に限定しているのかは不明だが、ドメインユーザにてクライアントOSにRDPでログインしようとしたところ、認証はされるのだが、ようこそ画面のままタイムアウトしてしまう。ローカルからのドメインユーザでのログインは問題が無いため、RDPに関連した設定がおかしいのだと思うのだが…

