今回は、Postfix+DovecotサーバにClamAVをインストールし、メール受信時にメールサーバでウィルススキャンを行うようにする。
OSはCentOS 7を用いるものとし、すでにPostfix+Dovecotの設定は終了しているものとする。 また、SELinuxについては停止をしている。
PostfixとClamAVの連携はよく行われている組み合わせなので、情報が豊富にある。 ここでは、以下のページを参考にamavisd-newと組み合わせて機能を実現する。
- (6) Postfix + Clamav + Amavisd - Server-world.info
- ClamAVとClamSMTPを利用してPostfixのメールをウイルスチェック | OXY NOTES ※ClamSMTPを用いた設定方法になっている
1. ClamAV・ClamAV Serverのインストール・設定
以下のコマンドで、ClamAVおよびClamAV Server等のインストールをする。
yum install -y epel-release
yum install -y --enablerepo=epel clamav amavisd-new clamav-server clamav-server-systemd clamav-update
1-1. ClamAVの設定・ウィルス定義ファイルの自動更新設定
インストール完了後、ClamAVおよびClamAV Serverの設定ファイルを編集する。
sed -i.bk '/^Example/s/^/#/g' /etc/freshclam.conf
sed -i.bk '$s/^/#/g' /etc/sysconfig/freshclam
設定後、ウィルス定義ファイルの自動更新を行わせるために以下のコマンドを実行し、serviceファイルを作成し起動する。
cat <<"EOF" >  /usr/lib/systemd/system/clam-freshclam.service
[Unit]
Description = freshclam scanner
After = network.target

[Service]
Type = forking
ExecStart = /usr/bin/freshclam -d -c 4
Restart = on-failure
PrivateTmp = true

[Install]
WantedBy=multi-user.target
EOF
systemctl start clam-freshclam
systemctl enable clam-freshclam
1-2. ClamAV Serverの設定ファイル編集・起動設定
以下のコマンドを実行し、ClamAV Serverで利用する設定ファイルを作成・編集する。
cp /usr/share/doc/clamav-server*/clamd.sysconfig /etc/sysconfig/clamd.amavisd
sed -e '1cCLAMD_CONFIGFILE=/etc/clamd.d/amavisd.conf' \
    -e '2cCLAMD_SOCKET=/var/run/clamd.amavisd/clamd.sock/etc/sysconfig/clamd.amavisd' \
    -i /etc/sysconfig/clamd.amavisd
echo 'd /var/run/clamd.amavisd 0755 amavis amavis -' >  /etc/tmpfiles.d/clamd.amavisd.conf
cat <<EOF >>  /usr/lib/systemd/system/clamd@.service

[Install]
WantedBy=multi-user.target
EOF
サービスを起動する。
systemctl start clamd@amavisd
systemctl enable clamd@amavisd
1-3.Amavisdの設定ファイル編集・起動設定
以下のコマンドを実行し、設定ファイルを編集する。
※ここで指定しているドメイン名・ホスト名はPostfixで定義しているものと同じ値とする。
sed -e '/^$mydomain/c $mydomain = '\''ドメイン名'\'';' \
    -e '/^# $myhostname/c $myhostname = '\''ホスト名'\'';' \
    -e '/^# $notify_method/s/^# //' \
    -e '/^# $forward_method/s/^# //' \
    -i.bk /etc/amavisd/amavisd.conf
サービスを起動する。
systemctl start amavisd spamassassin
systemctl enable amavisd spamassassin
2.Postfixとの連携設定
ClamAVおよびClamAV Serverの設定が終わったら、Postfixとの連携設定を行う。 以下のコマンドを実行し、Postfixの設定ファイルを編集する。
cp /etc/postfix/main.cf{,.bk}
echo 'content_filter=smtp-amavis:[127.0.0.1]:10024' >> /etc/postfix/main.cf
cp /etc/postfix/master.cf{,.bk}
cat <<"EOF" >> /etc/postfix/master.cf

smtp-amavis unix -    -    n    -    2 smtp
    -o smtp_data_done_timeout=1200
    -o smtp_send_xforward_command=yes
    -o disable_dns_lookups=yes
127.0.0.1:10025 inet n    -    n    -    - smtpd
    -o content_filter=
    -o local_recipient_maps=
    -o relay_recipient_maps=
    -o smtpd_restriction_classes=
    -o smtpd_client_restrictions=
    -o smtpd_helo_restrictions=
    -o smtpd_sender_restrictions=
    -o smtpd_recipient_restrictions=permit_mynetworks,reject
    -o mynetworks=127.0.0.0/8
    -o strict_rfc821_envelopes=yes
    -o smtpd_error_sleep_time=0
    -o smtpd_soft_error_limit=1001
    -o smtpd_hard_error_limit=1000
EOF
最後に、Postfixのサービスを再起動する。
systemctl restart postfix3. ウィルスメールを送信してテストする
これでPostfixとClamAVの連携は完了したので、最後にウィルス付きのメールを送信して無事除外されることを確認する。 メールサーバで以下のコマンドを実行してやる。
yum install -y mailx
wget http://www.eicar.org/download/eicar.com
echo test > /tmp/test.txt
mail -s 'test' -a ./eicar.com 宛先メールアドレス </tmp/test.txt # ウィルス付きメールのテスト
mail -s 'test' 宛先メールアドレス </tmp/test.txt # ウィルス無しメールのテスト
「/var/log/maillog」を確認して、以下のようにメールを削除したという記録が残っていればOKだ。
Dec 3 19:10:09 BS-SAKURA-TEST01 postfix/pickup[8531]: 63EFED29F: uid=0 from=
Dec 3 19:10:09 BS-SAKURA-TEST01 postfix/cleanup[8566]: 63EFED29F: message-id=<20161203101009.63EFED29F@mx1.test0101.com>
Dec 3 19:10:09 BS-SAKURA-TEST01 postfix/qmgr[8532]: 63EFED29F: from=<root@test01.test0101.com>, size=1034, nrcpt=1 (queue active)
Dec 3 19:10:09 BS-SAKURA-TEST01 clamd[8329]: /var/spool/amavisd/tmp/amavis-20161203T190739-08429-jZFtU7ok/parts/p004: Eicar-Test-Signature FOUND
Dec 3 19:10:09 BS-SAKURA-TEST01 clamd[8329]: /var/spool/amavisd/tmp/amavis-20161203T190739-08429-jZFtU7ok/parts/p002: Eicar-Test-Signature FOUND
Dec 3 19:10:09 BS-SAKURA-TEST01 amavis[8429]: (08429-05) Blocked INFECTED (Eicar-Test-Signature) {DiscardedInbound,Quarantined}, [127.0.0.1] <root@test01.test0101.com> -> <test@test01.test0101.com>, Message-ID: <20161203101009.63EFED29F@mx1.test0101.com>, mail_id: MbIB-eZ5PucC, Hits: -, size: 1034, 85 ms
Dec 3 19:10:09 BS-SAKURA-TEST01 postfix/smtp[8568]: 63EFED29F: to=<test@test01.test0101.com>, relay=127.0.0.1[127.0.0.1]:10024, delay=0.11, delays=0.02/0/0.01/0.09, dsn=2.7.0, status=sent (250 2.7.0 Ok, discarded, id=08429-05 - INFECTED: Eicar-Test-Signature)
Dec 3 19:10:09 BS-SAKURA-TEST01 postfix/qmgr[8532]: 63EFED29F: <span style="color: #ff0000;">removed</span></pre>
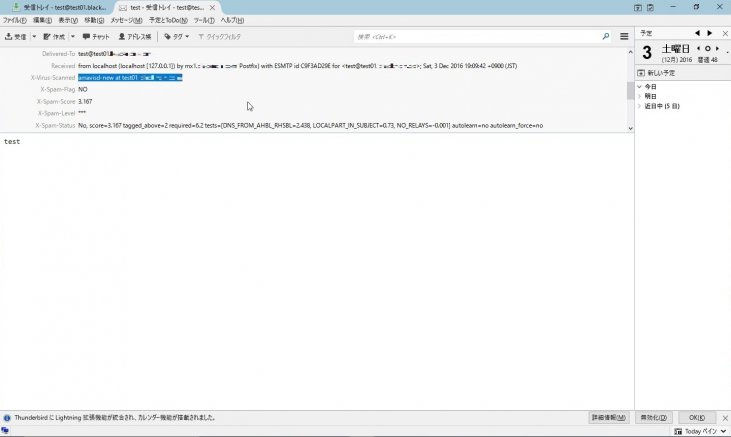
ウィルス無しメールについても、無事送信されてることを確認してメールヘッダを見てみよう。
下の画像のように「X-Virus-Scanned」というヘッダがあればOKだ。

なお、本設定のなかでspamassassinについてもインストールしているため、スパムメールも除外するようになっている。
